Photography Composition Techniques: A Beginner’s Guide to Taking Better Photos
July 28, 2026
Improve Physical Health Naturally: A Simple Guide to Living a Stronger and Healthier Life
July 28, 2026
Photography is one of the most enjoyable hobbies you can start. It allows you to capture beautiful memories, express your creativity, and see the world from a different perspective. The best part is that you do not need expensive equipment or years of experience to begin. With a little practice and the right guidance, anyone can learn to take amazing photos.
This beginner photography tutorial is designed for people who are just starting their photography journey. Whether you own a DSLR, mirrorless camera, or even a smartphone with manual controls, the basic photography principles remain the same. By understanding camera settings, lighting, composition, and practice techniques, you can quickly improve your skills.
Why Learn Photography?
Photography is more than simply pressing a button. Every photo tells a story, captures emotions, and preserves moments that can last forever. Learning photography can benefit you in many ways.
Some of the biggest advantages include:
- Capture memorable moments with family and friends.
- Develop creative thinking and artistic skills.
- Start a photography business in the future.
- Improve your travel experiences by taking better pictures.
- Build a strong social media or online portfolio.
Whether photography becomes your hobby or your career, learning the basics is the first step toward success.
Choosing the Right Camera
Many beginners worry about buying the perfect camera. The truth is that the best camera is the one you already have.
You can learn photography using:
- DSLR cameras
- Mirrorless cameras
- Compact digital cameras
- Smartphones with manual camera settings
If you are planning to buy your first camera, choose one that allows manual settings. Manual control helps you understand how photography works instead of depending entirely on automatic mode.
Remember that a skilled photographer can create beautiful images even with an affordable camera.
Understanding Your Camera
Before taking photos, spend some time learning the buttons and settings on your camera.
Become familiar with:
- Power button
- Shutter button
- Mode dial
- Zoom controls
- Menu settings
- Focus modes
- Image playback
Reading the user manual may not sound exciting, but it will help you understand your camera much faster.
The more comfortable you become with your equipment, the easier photography will feel.
Photography Exposure Explained
Exposure simply means how bright or dark your image appears.
Exposure depends on three important settings known as the Exposure Triangle.
1. Aperture
Aperture controls how much light enters the camera lens.
A wider aperture allows more light and creates a blurry background, making your subject stand out.
A smaller aperture lets in less light and keeps more of the image sharp from front to back.
Portrait photographers often use wide apertures, while landscape photographers usually choose smaller apertures.
2. Shutter Speed
Shutter speed controls how long the camera sensor receives light.
Fast shutter speeds freeze movement.
Examples include:
- Sports
- Birds
- Running children
- Moving vehicles
Slow shutter speeds create motion blur.
These are useful for:
- Waterfalls
- Rivers
- Light trails
- Night photography
Using slow shutter speeds often requires a tripod to prevent camera shake.
3. ISO
ISO controls the camera’s sensitivity to light.
Lower ISO values produce cleaner images with less digital noise.
Higher ISO settings make the camera brighter but can also reduce image quality.
Whenever possible, use the lowest ISO that provides proper exposure.
Learn the Different Camera Modes
Most cameras include several shooting modes.
Auto Mode
This mode automatically selects all settings.
It is perfect for complete beginners but offers little creative control.
Program Mode (P)
Program mode chooses exposure automatically while allowing adjustments to some settings.
It is a great stepping stone before learning manual mode.
Aperture Priority (A or Av)
You choose the aperture while the camera selects the shutter speed.
This mode works well for portraits and landscapes.
Shutter Priority (S or Tv)
You choose the shutter speed, and the camera adjusts the aperture.
It is useful for sports and wildlife photography.
Manual Mode (M)
Manual mode gives you complete control over every camera setting.
Although it seems difficult at first, it is the best way to understand photography.
Practice with manual mode regularly, and your confidence will grow.
Understanding Focus
A sharp image is one of the biggest signs of good photography.
Modern cameras offer different focusing options.
Single Autofocus
Best for subjects that are not moving.
Examples include:
- Flowers
- Buildings
- Food photography
Continuous Autofocus
Designed for moving subjects.
Examples include:
- Animals
- Children
- Sports
- Vehicles
Manual Focus
Sometimes autofocus struggles in low light or with close-up photography.
Manual focus allows you to adjust sharpness yourself.
Many experienced photographers still use manual focus in special situations.
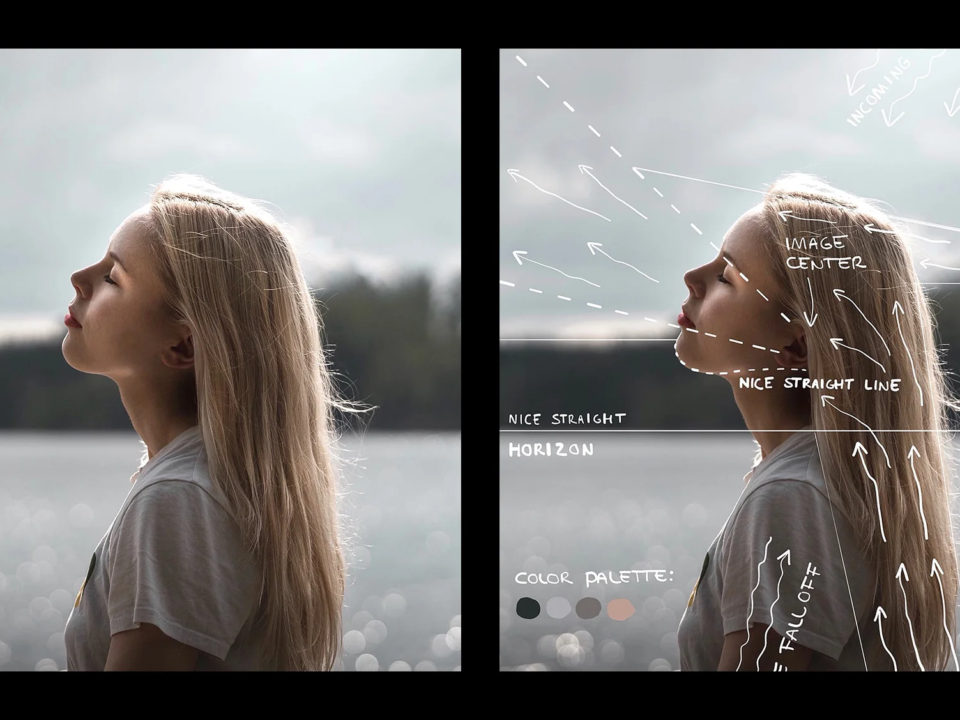
Composition Makes Photos Beautiful
Composition means arranging subjects within your frame.
Even an expensive camera cannot fix poor composition.
Rule of Thirds
Imagine dividing your photo into nine equal boxes.
Place your main subject where the lines intersect instead of directly in the centre.
This simple technique instantly creates more balanced images.
Leading Lines
Roads, bridges, rivers, fences, and pathways naturally guide viewers toward your subject.
Leading lines make photos more interesting and help create depth.
Fill the Frame
Move closer to your subject instead of leaving unnecessary empty space.
Filling the frame helps highlight important details.
Keep Backgrounds Clean
A messy background distracts from your main subject.
Before taking the photo, quickly check for unwanted objects like poles, rubbish bins, or people.
A simple background usually creates a stronger photograph.
Lighting Is Everything
Professional photographers often say that photography is the art of capturing light.
Good lighting can completely change the quality of your images.
Natural light is usually the easiest light for beginners.
The best times for outdoor photography are:
- Early morning
- Late afternoon
- Golden hour before sunset
During these times, sunlight is softer and warmer, creating beautiful colours and gentle shadows.
Avoid taking portraits under harsh midday sunlight whenever possible because it creates strong shadows on the face.